Back again with some peanut butter cups, this time we're using Lily's chips, so they don't melt when out of the freezer, and throwing in an Easter theme with some cute baskets and chicks!! These are one point each and have the most perfect texture and flavor to them. The outside is a perfect, thin layer of crunchy chocolate while the inside in a rich, sweet, creamy peanut butter. A fun treat for the holiday next week!
How many WW points is this now?! Click on the link below and it will take you to the recipe I made within your own WW app. Your specific points will be calculated, and you can track that.
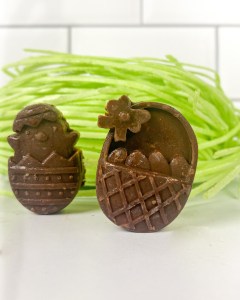
Let me preface this by saying I hate this chocolate mold. Okay, yeah, it's adorable and those chicks are so cute. But this thing had way too many teeny tiny crevasses and made this dish so much harder than it had to be. I would highly suggest just find an Easter egg mold, or maybe some bunnies. Something with less teeny tiny crevasses. Worth it though, these came out super cute!!
This mold was Wilton brand from Joann's and is called the basket chicken egg candy mold (Item #17808734). This was the only Easter mold in stock near me and I was determined to make these today and I did not want to wait until Amazon delivered something else tomorrow.

If I didn't have to work with all the crevasses, this would have taken no time at all, but it ended up taking me about an hour. Mindful, there is a 30 minute freezing/waiting period in there too where I did the dishes, but still, about an hour.
This was the second batch I made. The first batch, I did not wait long enough at the end and when I went to pop them out, they fell apart. I suggest waiting as long as you can to pop them out. I waited overnight this time and it worked out well. I am planning on making these again next weekend when we go to my sister in law's house for Easter.
Check out my TikTok video showing exactly how I made them, step by step.
Check out my WW Easter guide where I detail out some of my dishes that would be PERFECT for Easter, you can click the link below.
What You Need:
The only 'equipment' you will need is a microwave and freezer. Pretty simple, no cooking required.
Obviously, you will need the mold as well. Feel free to grab any shape you want. The silicone ones work best because you are able to pop the cups out at the end. My molds were about one inch by one inch.
This is also a very limited ingredient recipe.
- Lily's no sugar added chocolate chips
- Olive oil
- PB2 powder
- Swerve confectioners sugar
- Plain unsweetened almond milk
I grabbed my Lily's chocolate chips at Target. That seems to be the only place I can find them.

What To Do:
Start by measuring out the chocolate chips. Use a microwave safe dish so you can just microwave the chips straight in the bowl, instead of transferring them to something else.
This recipe is calculated using 56 grams of chocolate chips (about 120 pieces); however, I recommend adding a little more, about 65 grams, because a bit of the chocolate will get picked up on the knife and won't be used, and it is very hard to scrape out every last drop of melted chocolate. I always make a little more because not all is used.

Add the oil to the dish and mix it up with the chocolate chips to evenly coat. This will melt them melt and stay smooth.

Microwave the chips for about 45 seconds, until melted. You will want to stir them every 10 seconds. Do not over melt and burn the chocolate. It will look like this.

Grab your mold and put just enough chocolate to cover the bottoms and the sides a little. Spread that out evenly with your knife. Pop those in the freezer for about 10 minutes.

While those set, make the peanut butter.
Place the peanut butter powder, sugar and almond milk in another small dish and stir that together. You can add more or less almond milk, depending on your desired peanut butter consistency, but I like this ratio.

Once the chocolate has set, grad the mold from the freezer. Evenly divide the peanut butter mixture over the chocolates. You should fill up the molds about ⅔ to ¾ of the way full. The set that in the freezer for about 20 minutes.

Once the peanut butter is a little hardened, microwave the chocolate chips again so they are nice and liquid-y again. Just about another 10 seconds in the microwave. Place the remaining chocolate over the mold and flatten out with the knife.

It got a little messy at the end but they still taste great!!
I finished this around 5:30 and we went out to dinner and drinks and didn't get home until 10:00 so I left them in the freezer until the morning. I think that was the safest bet as the peanut butter really needed to harden with these molds since they were so fragile.
In the morning, I just popped them out of the molds and set them in the fridge to eat later that day. I got a little impatient and two of them broke, as I mentioned, this mold was terrible and had so many crevasses, but the broken ones still tasted great.

I cannot wait to make these again next weekend for Easter! Any ideas on what I should do with them? Maybe I'll put them on cupcakes!!
Don't forget to check out my Easter guide with all my Easter friendly WW recipes.
Onto The Recipe!

Easter Peanut Butter Cups
Equipment
- Easter shaped chocolate mold
- Microwave
- Freezer
Ingredients
- 56 grams Lily's chocolate chips no sugar added
- ½ teaspoon olive oil
- 2 tablespoons PB2 powder
- 2 teaspoons confectioners sugar replacement Swerve
- 1 tablespoon plain unsweetened almond milk
Instructions
- Measure out 56 grams of Lily's no sugar added chocolate chips, it is about 120 chocolate chips, into a microwave safe dish. Add the oil and mix to combine. Microwave in 10 second intervals for about 45 seconds, until melted, stirring each 10 second interval.
- Place just enough chocolate in the bottom of each mold to completely cover the bottom and the sides a bit. Spread out to evenly cover then place in the freezer for 10 minutes.
- Meanwhile, combine the PB2 powder, sugar and milk in a small bowl. Stir to combine and get the lumps out.
- Evenly divide the peanut butter into each mold, on top of the chocolate, and spread out across each mold. Place in the freezer for about 20 minutes.
- Heat the chocolate up again and spread of evenly over each mold. Using a knife, carefully smooth out the tops of each mold.
- Place in the freezer for 2 hours or overnight.
- Store in the fridge once set.
Nutrition
One piece per serving
Leave a Reply